Integration of Wallarm FAST Plugin with Jenkins
Compatibility
Please note that the Wallarm FAST plugin only works with Freestyle Jenkins projects. If your project is a Pipeline type, then please check out the example of integration with Jenkins via FAST node.
Step 1: Installing Plugin
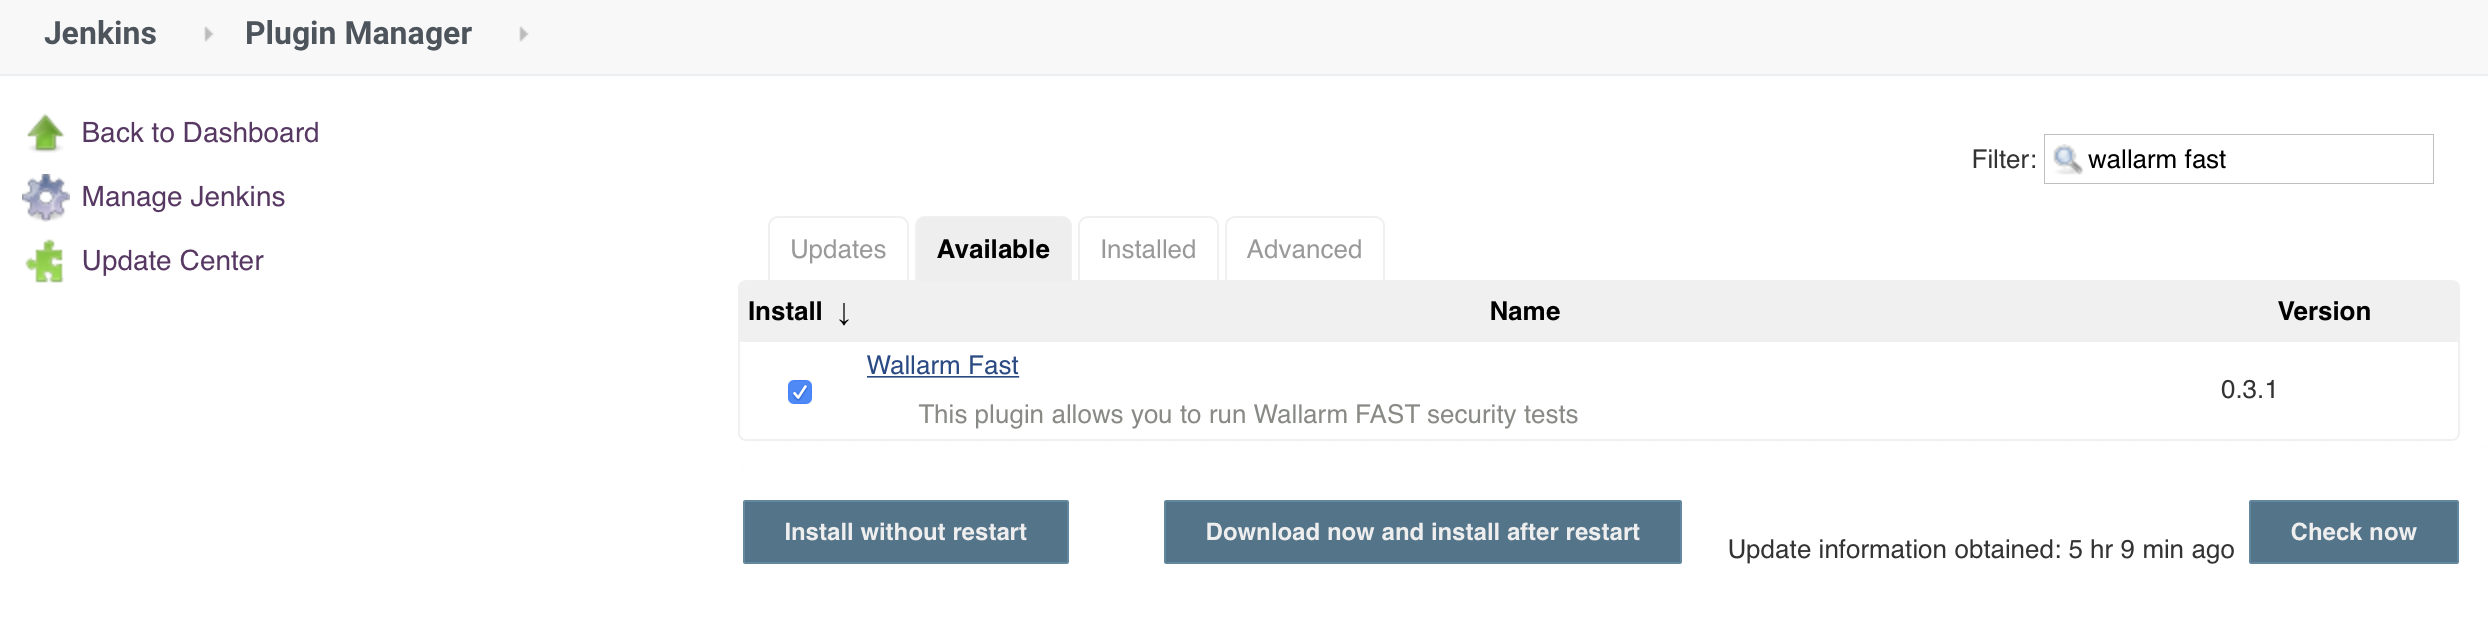
Install Wallarm FAST plugin in the Jenkins project using Plugin Manager. There is more detailed information about managing plugins available in Jenkins official documentation.
If problems have been encountered during installation, then build the plugin manually.
To build the Wallarm FAST plugin manually, follow the steps below: Execute the following commands: After successful execution of the commands, the Install the Manual building of Wallarm FAST plugin
 git clone https://github.com/jenkinsci/wallarm-fast-plugin.git
 cd wallarm-fast-plugin
 mvn package
wallarm-fast.hpi plugin file will be generated in the target directory.wallarm-fast.hpi plugin using Jenkins instructions.
Step 2: Adding Steps of Recording and Testing
Configured workflow
Further instructions will require the configured Jenkins workflow to correspond to one of the following points:
- Test automation must be implemented. In this case, the request recording and security testing steps will be added.
- Set of baseline requests must be recorded. In this case, the security testing step will be added.
Adding the Step of Request Recording
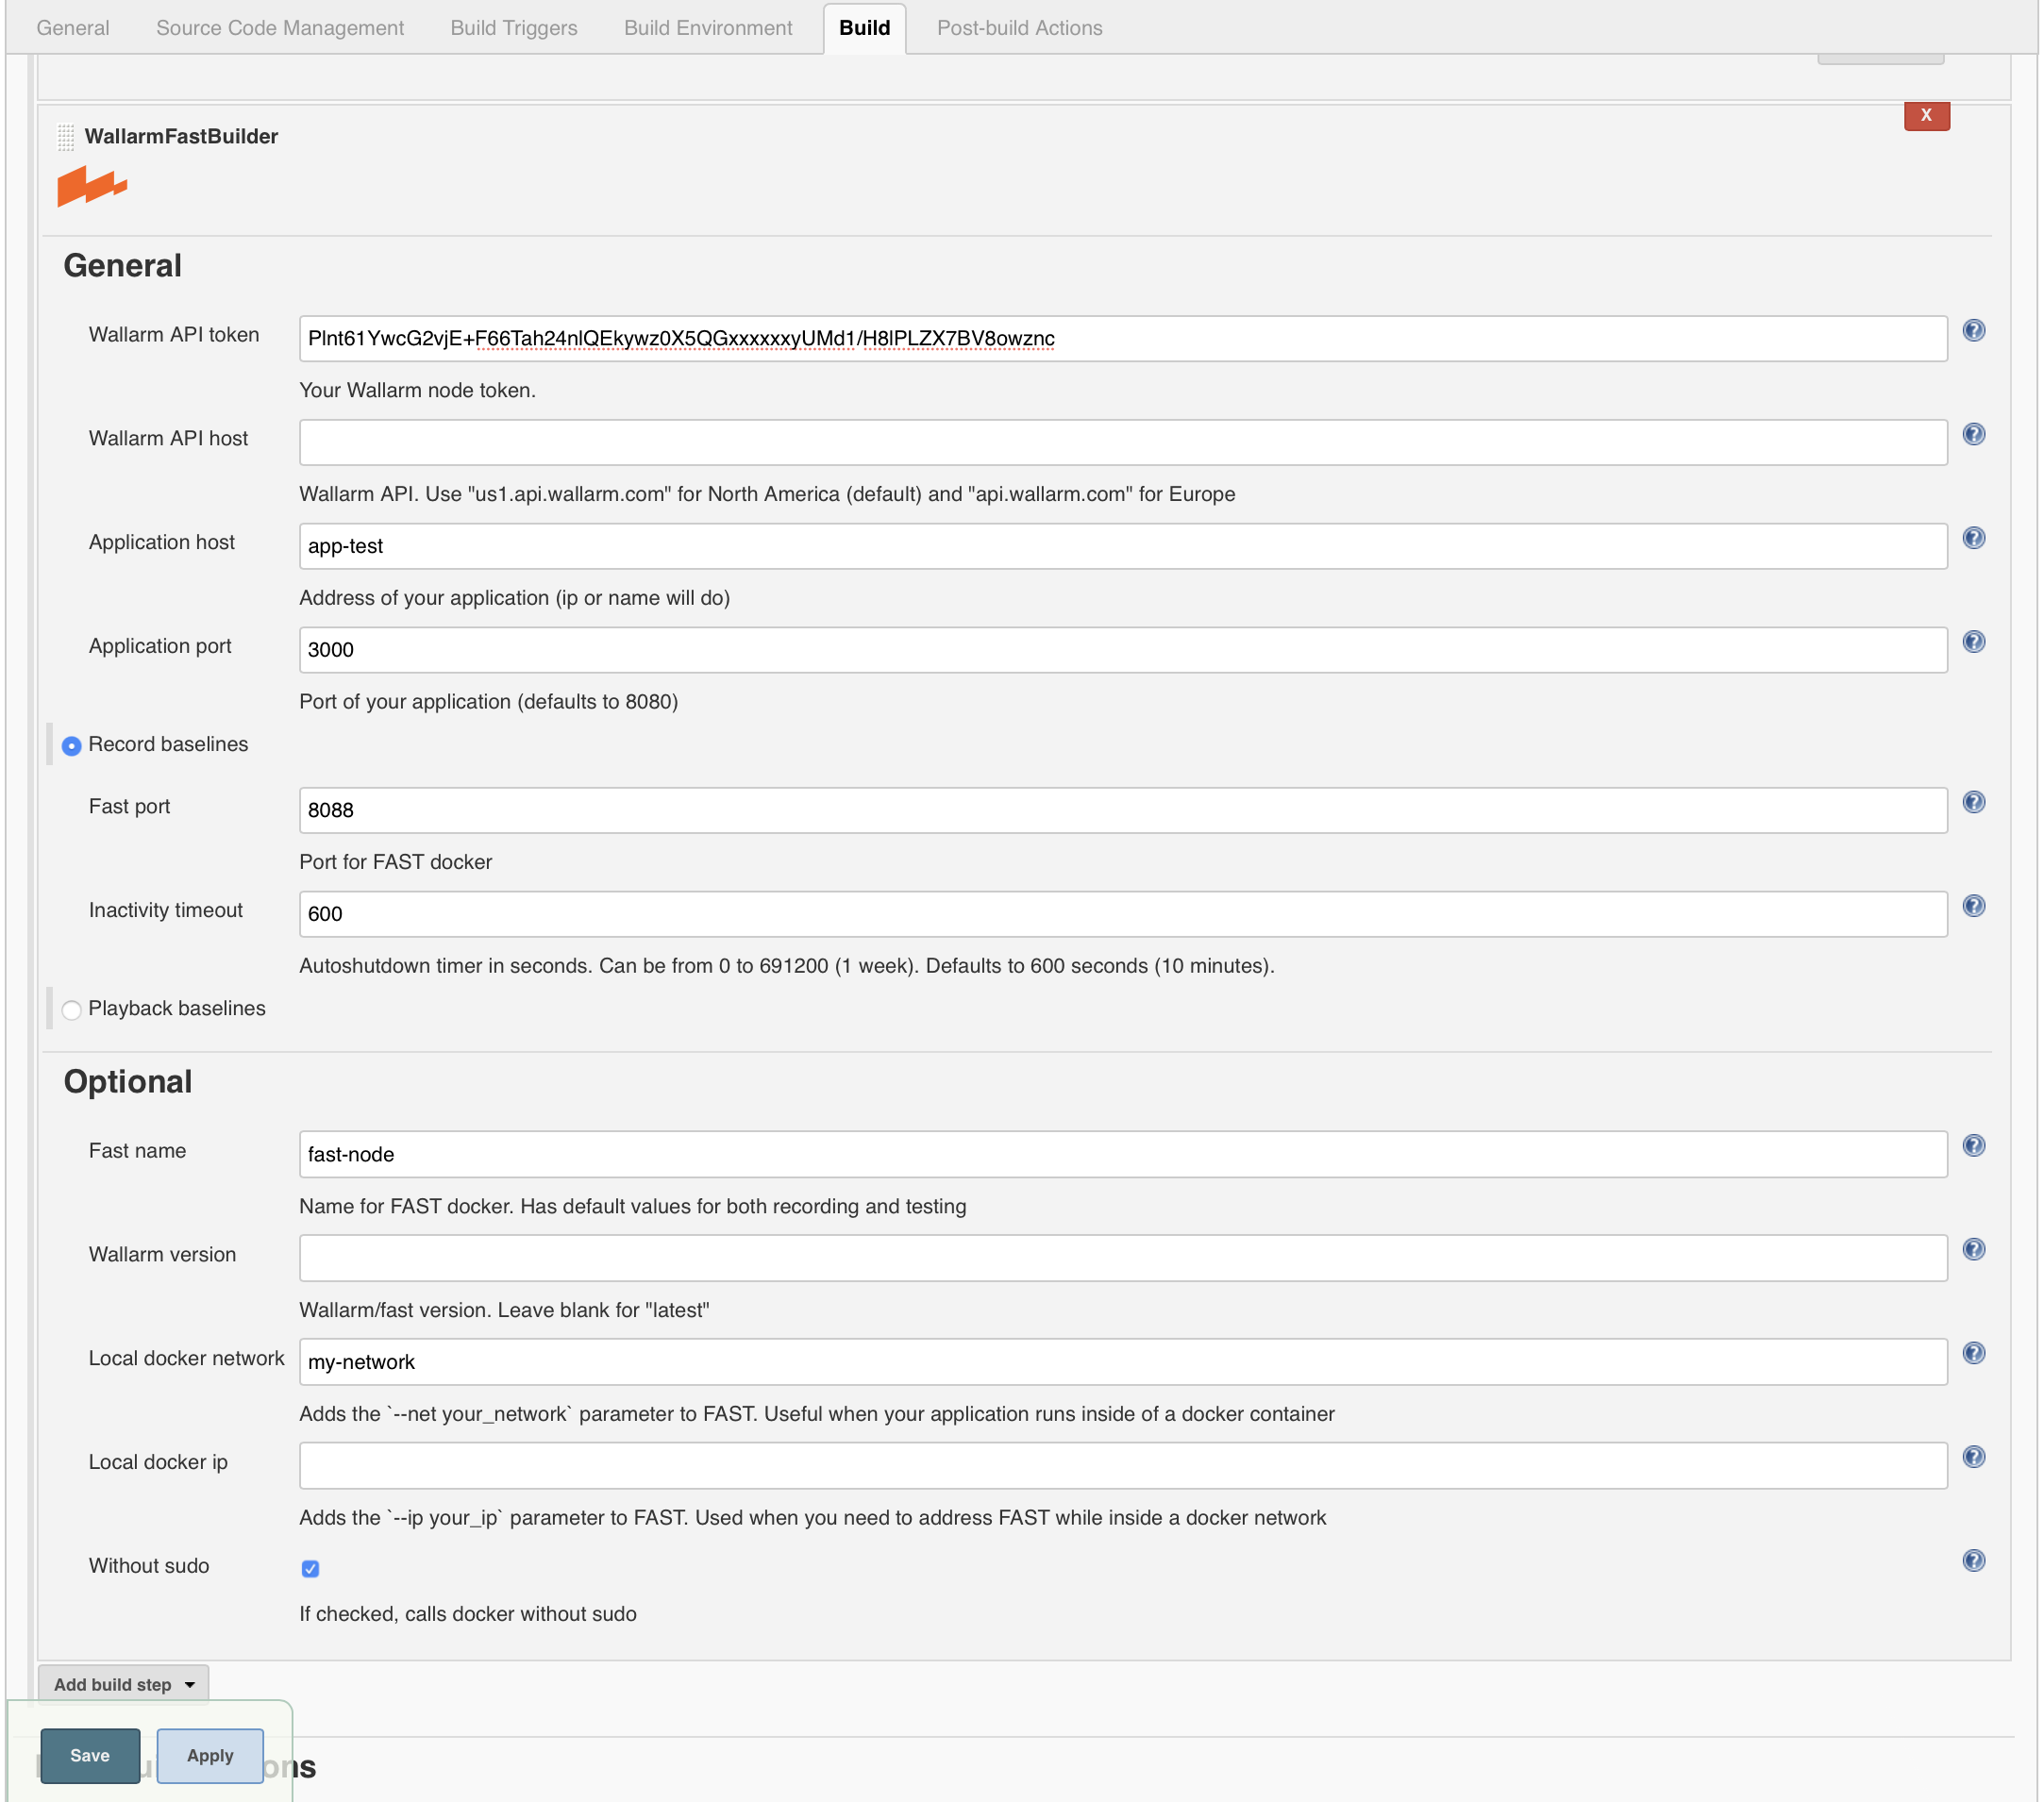
To add the step of request recording, select the Record baselines mode on the Build tab and set up the variables described below. The step of request recording must be added before the step of automated application testing.
Network
Before recording requests, make sure that the FAST plugin and tool for automated testing are on the same network.
Variables in the recording mode
Variable
Value
Required
Wallarm API tokenA token from the Wallarm cloud.
Yes
Wallarm API hostThe address of the Wallarm API server.
Allowed values: us1.api.wallarm.com for the server in the Wallarm US cloud and api.wallarm.com for the server in the Wallarm EU cloud.
Default value is us1.api.wallarm.com.No
Application hostThe address of the test application. The value can be an IP address or a domain name.
Yes
Application portThe port of the test application. Default value is 8080.
No
Fast portThe port of FAST node.
Yes
Inactivity timeoutIf no baseline requests arrive to the FAST node within this interval, then the recording process is stopped along with the FAST node.
Allowed value range: from 1 second to 1 week.
The value must be passed second.
Default value: 600 seconds (10 minutes).No
Fast nameThe name of the FAST node Docker container.
No
Wallarm versionThe version of the used FAST node.
No
Local docker networkThe Docker network where the FAST node runs.
No
Local docker ipThe IP address that will be assigned to the running FAST node.
No
Without sudoWhether to execute the FAST node commands with the rights of the user ran FAST node. By default, commands are executed with the superuser rights (via sudo).
No
Example of configured plugin for test recording:
Secondly, update the step of automated testing by adding FAST node as a proxy.
The FAST plugin will automatically stop request recording when testing is finished.
Adding the Step of Security Testing
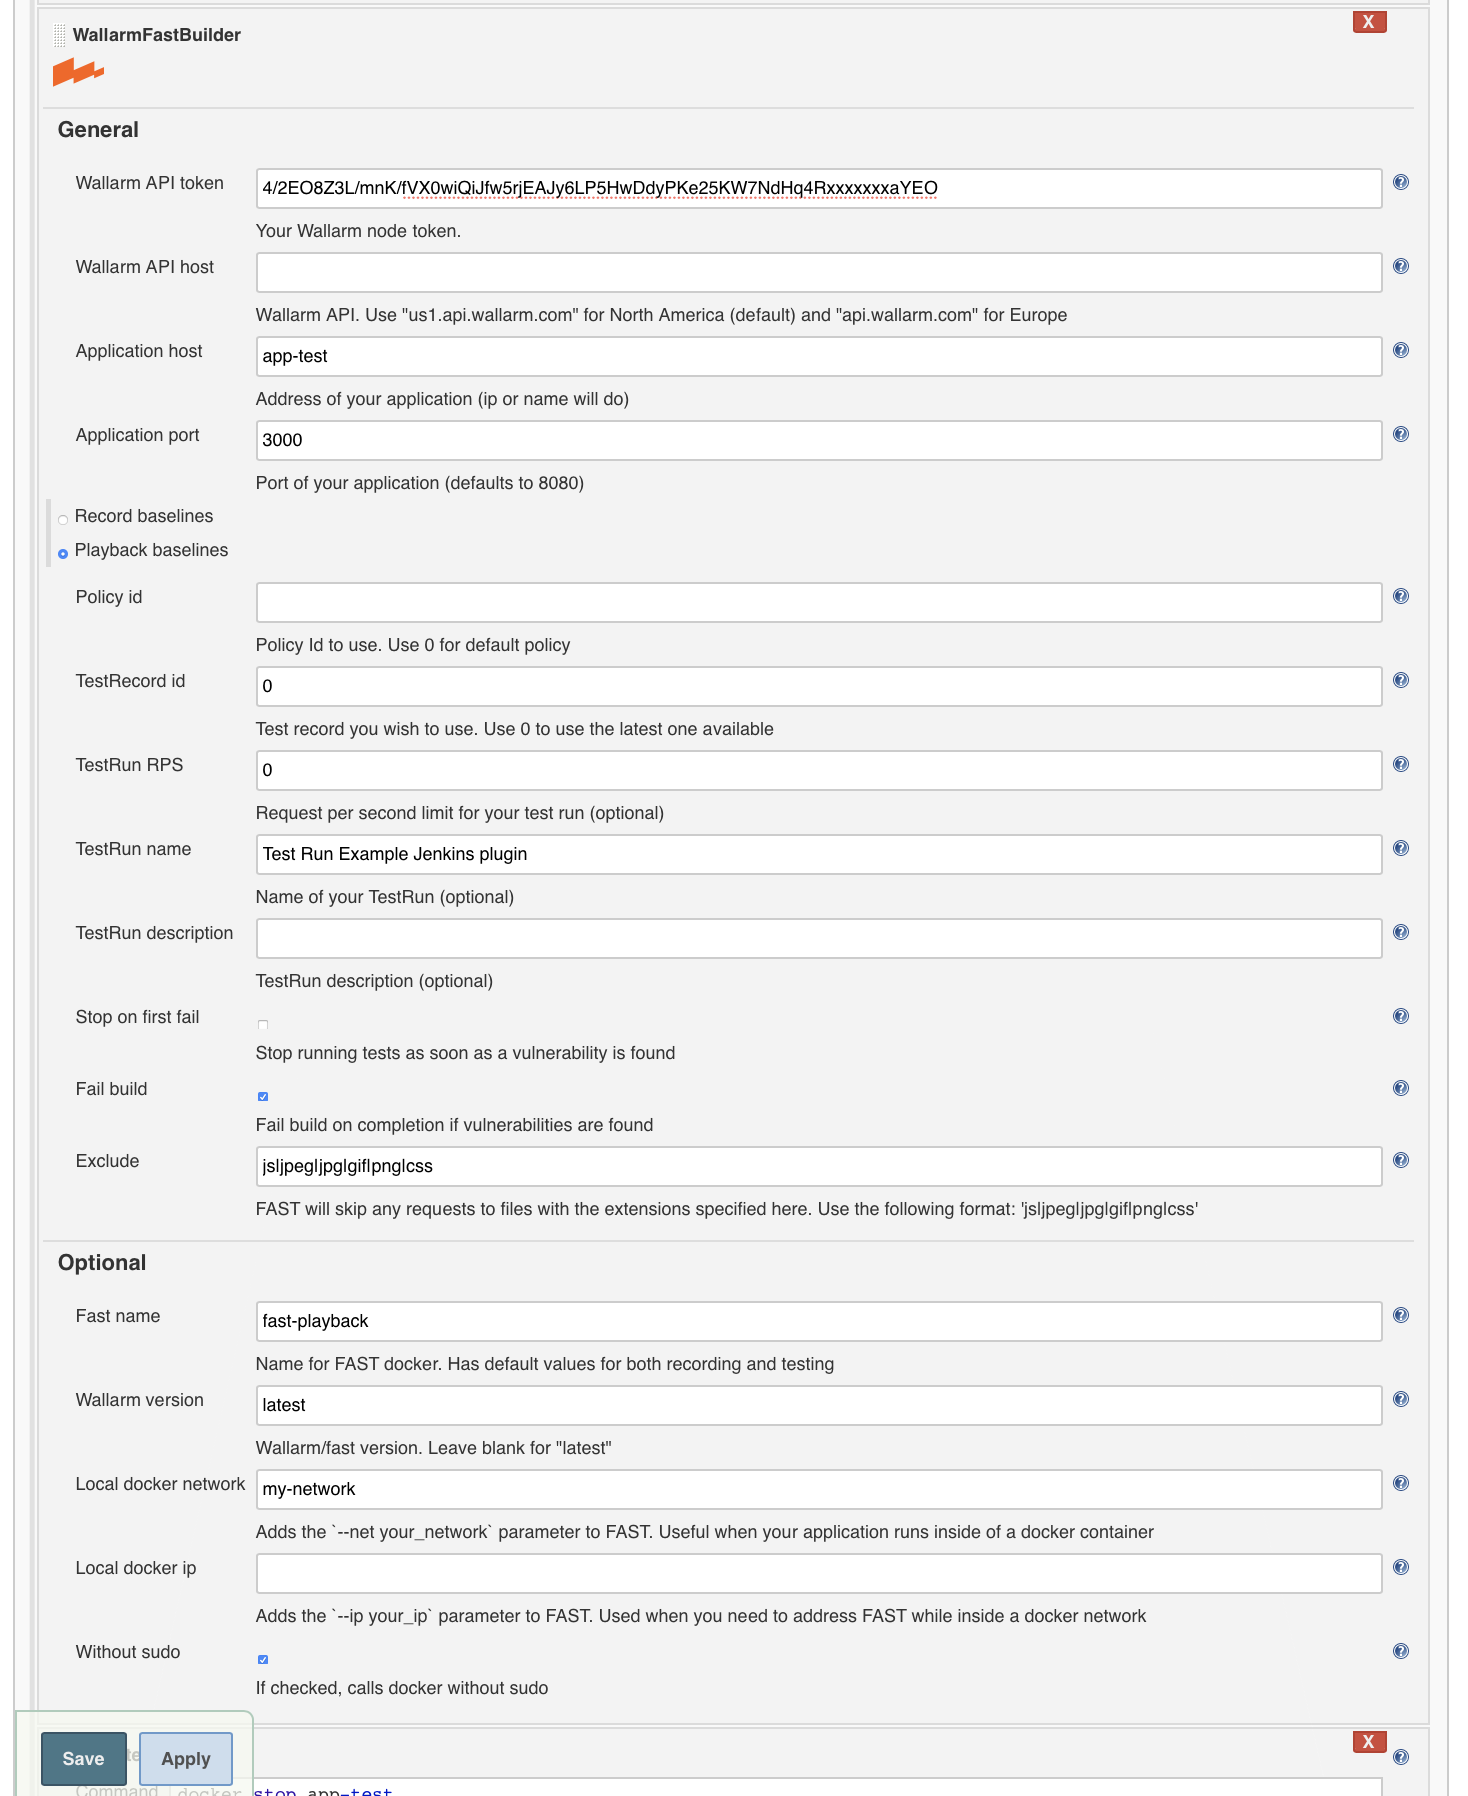
To add the step of security testing, select the Playback baselines mode on the Build tab and set up variables described below.
Please note that the application must be already started and available for testing before running security testing.
Network
Before security testing, make sure that the FAST plugin and application are on the same network.
Variables in the testing mode
Variable
Value
Required
Wallarm API tokenA token from the Wallarm cloud.
Yes
Wallarm API hostThe address of the Wallarm API server.
Allowed values: us1.api.wallarm.com for the server in the Wallarm US cloud and api.wallarm.com for the server in the Wallarm EU cloud
Default value is us1.api.wallarm.com.No
Application hostThe address of the test application. The value can be an IP address or a domain name.
Yes
Application portThe port of the test application. Default value is 8080.
No
Policy idTest policy ID.
Default value is 0-Default Test Policy.No
TestRecord idTest record ID. Corresponds to TEST_RECORD_ID.
Deafult value is the last test record created by used FAST node.No
TestRun RPSA limit on the number of test requests (RPS, requests per second) to be sent to the target application.
Minimum value: 1.
Maximum value: 500.
Default value: null (RPS is unlimited).No
TestRun nameThe name of the test run.
By default, the value will be automatically generated from the date of test run creation.No
TestRun descriptionThe description of the test run.
No
Stop on first failWhether to stop testing when an error occurs.
No
Fail buildWhether to finish the build with an error when vulnerabilities are found during security testing.
No
ExcludeThe list of file extensions to exclude from security testing.
To split up extensions, the ǀ symbol is used.
By default, there are no exceptions.No
Fast nameThe name of the FAST node Docker container.
No
Wallarm versionThe version of the used FAST node.
No
Local docker networkThe Docker network where the FAST node runs.
No
Local docker ipThe IP address that will be assigned to the running FAST node.
No
Without sudoWhether to execute the FAST node commands with the rights of the user ran FAST node. By default, commands are executed with the superuser rights (via sudo).
No
Example of a configured plugin for security testing:
Step 3: Getting the Result of Testing
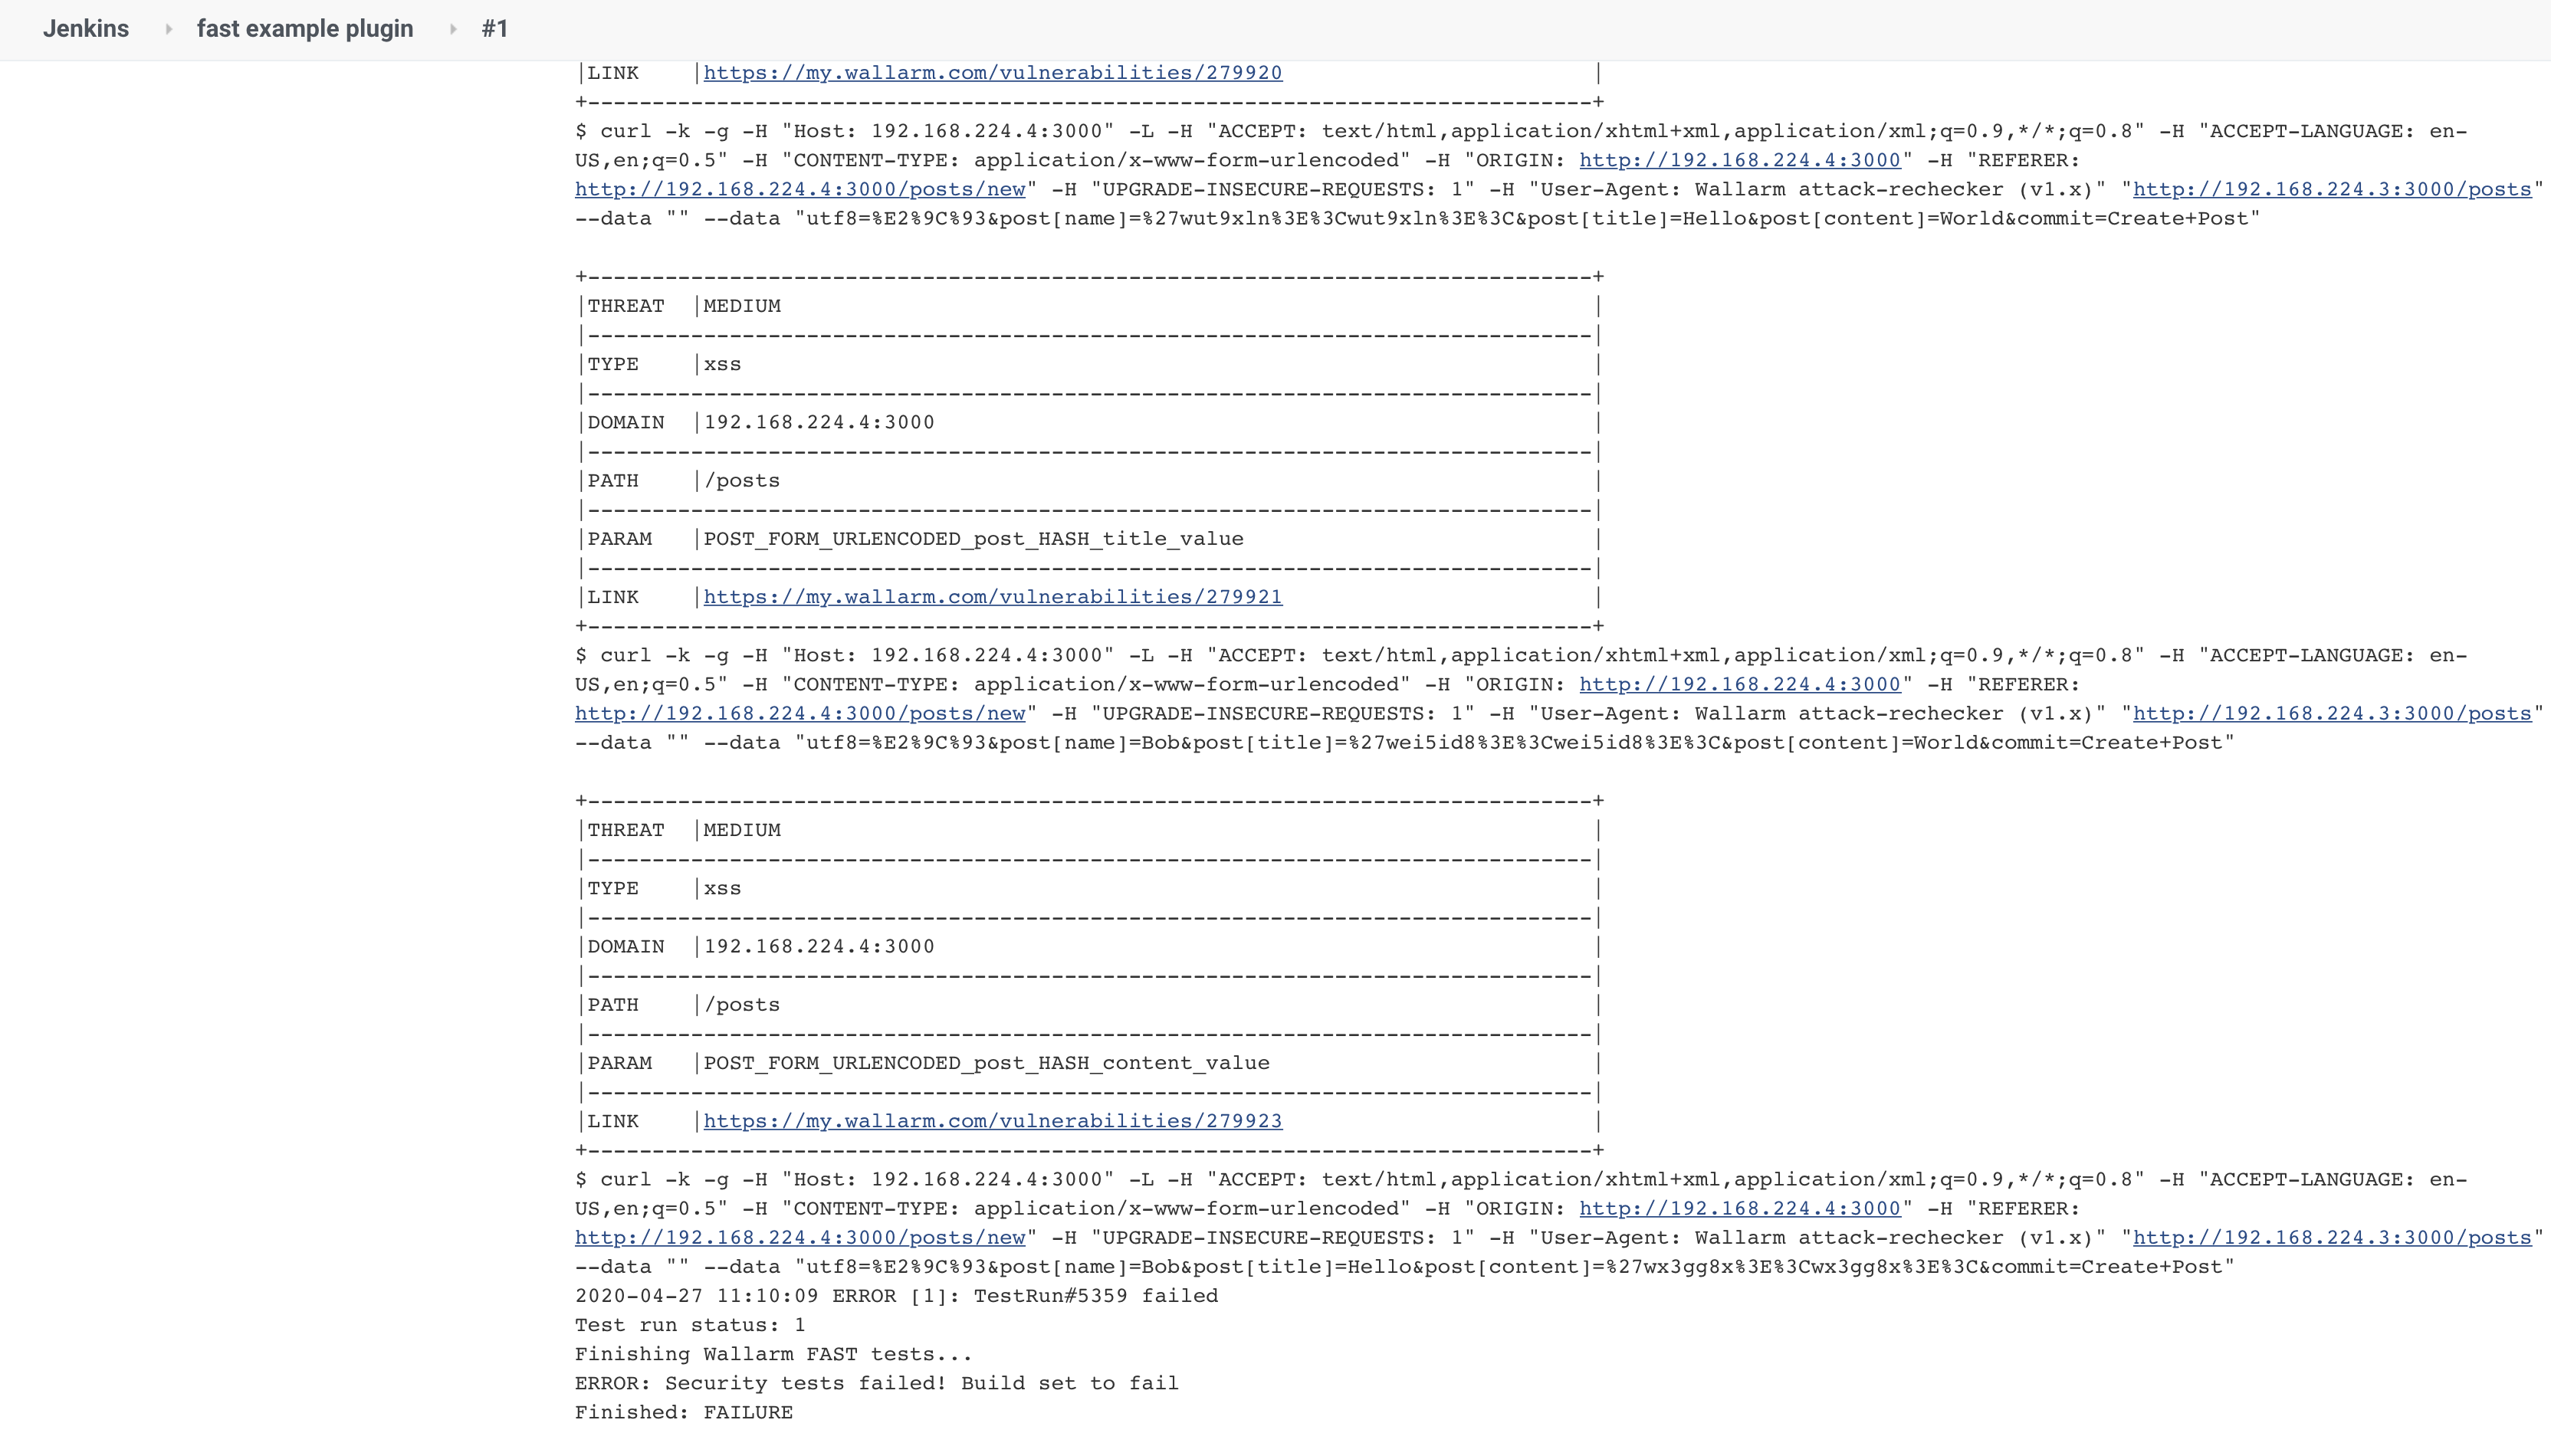
The result of security testing will be displayed in the Jenkins interface.
More Examples
You can find examples of integrating FAST to CircleCI workflow on our GitHub and Jenkins.
If you have questions related to FAST integration, please contact us.
results matching ""
No results matching ""
results matching ""
No results matching ""